No two online stores are the same. There are so many ways to sell stuff online. In WordPress, WooCommerce is the clear pack-leader, finding the right balance between “solid foundation” and “flexibility”. The WooCommerce plugin has some decent off-the-shelf blocks, but “off-the-shelf” doesn’t always cut it. When it comes to properly leveraging what makes a store unique, you often need blocks that aren’t quite so cookie-cutter.
For example:
I need a block that lets me drop a thank you message and a coupon code onto a page, but only for logged in customers that have previously purchased from me.
That’s what we’re going to build here. The custom block will:
- Only display for logged in customers
- Only display if the customer has purchased above a certain number of times
- Present a nice message and give them a coupon code
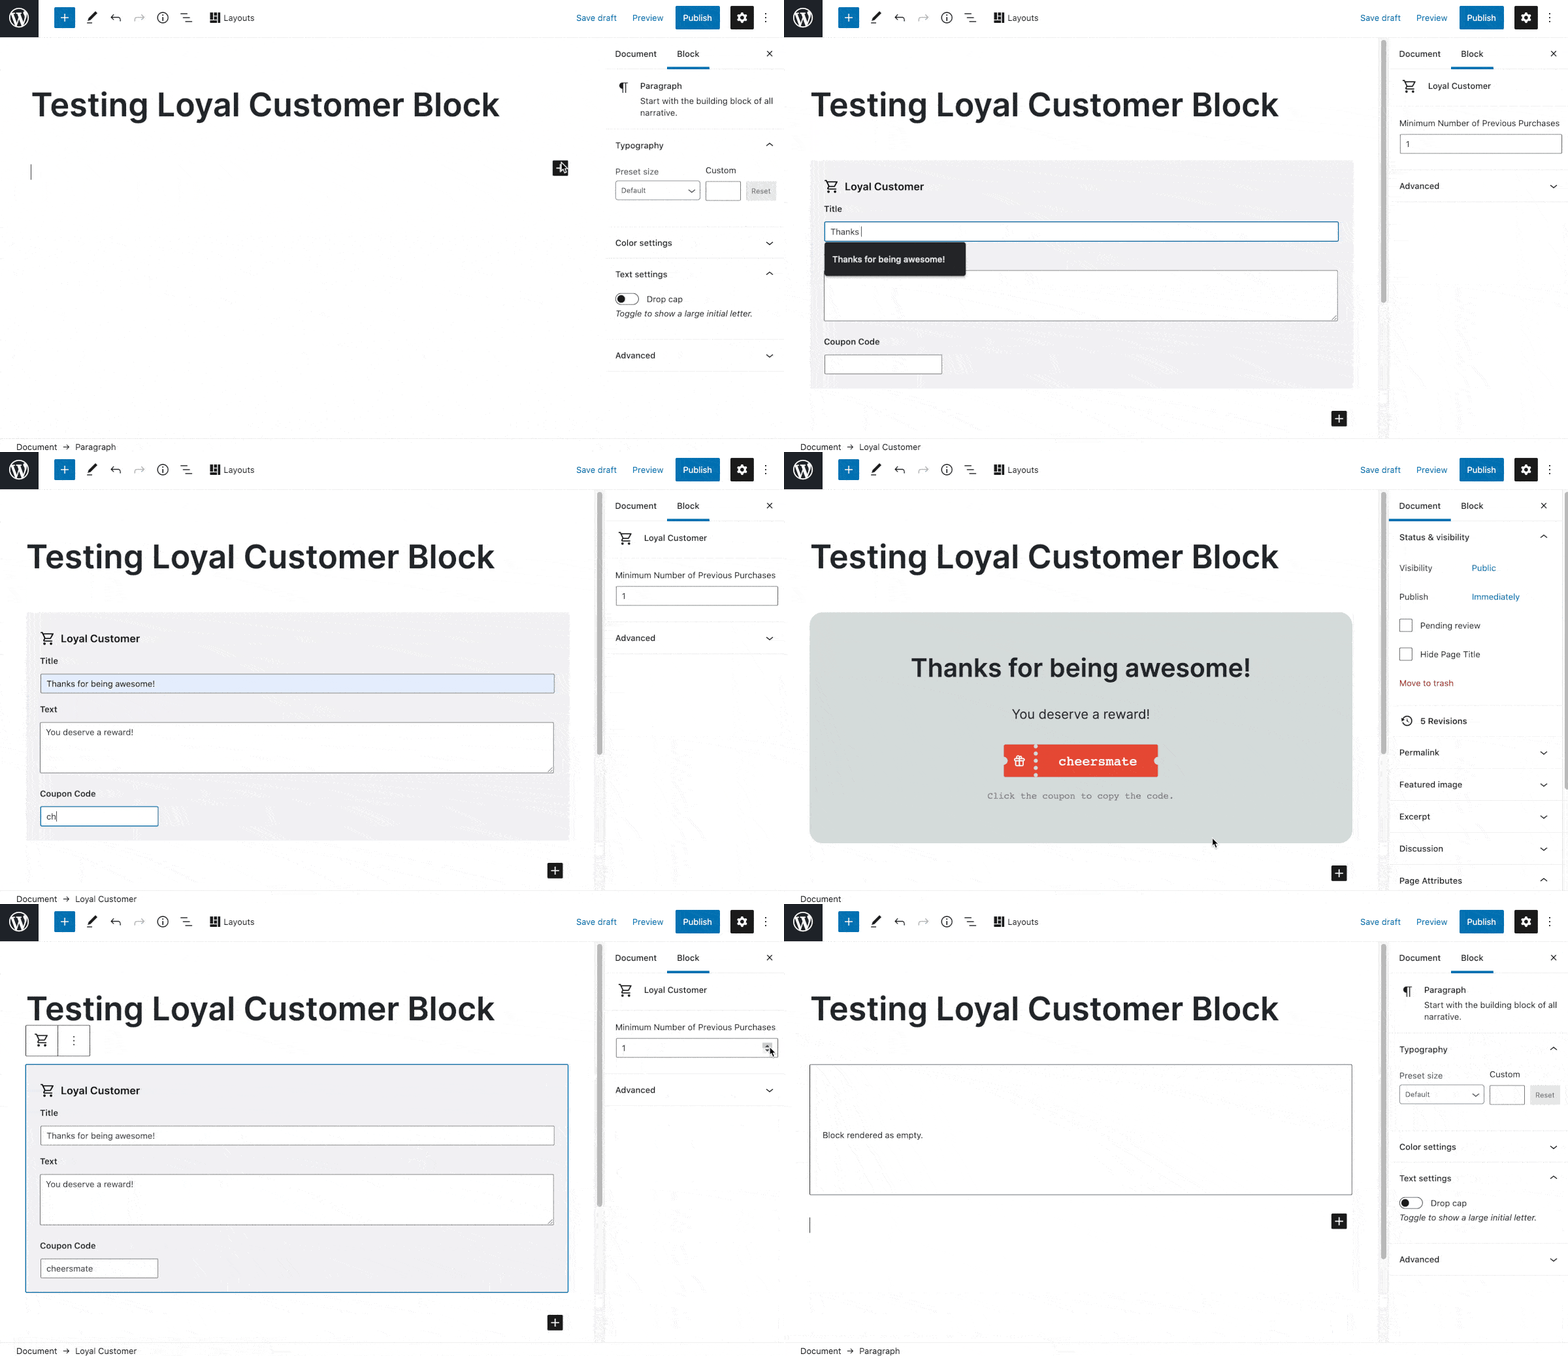
Let’s call this the “Loyal Customer” block. When done, it’s going to look like this:

Let’s do this!
Step 1: The Setup
- Fresh WordPress install on Local
- Genesis Block Theme Beta installed and active
- Site content spun up with the Tangerine Collection from Genesis Blocks Pro
- WooCommerce installed and active
- Demo content for WooCommerce added to the site
- An order created for myself as the logged-in user
- Genesis Custom Blocks installed and active
The 2 items in bold above are the only actual dependencies. Everything else is either about the general set-up of the site or dummy content to help demo the block working.
Step 2: The Block Builder
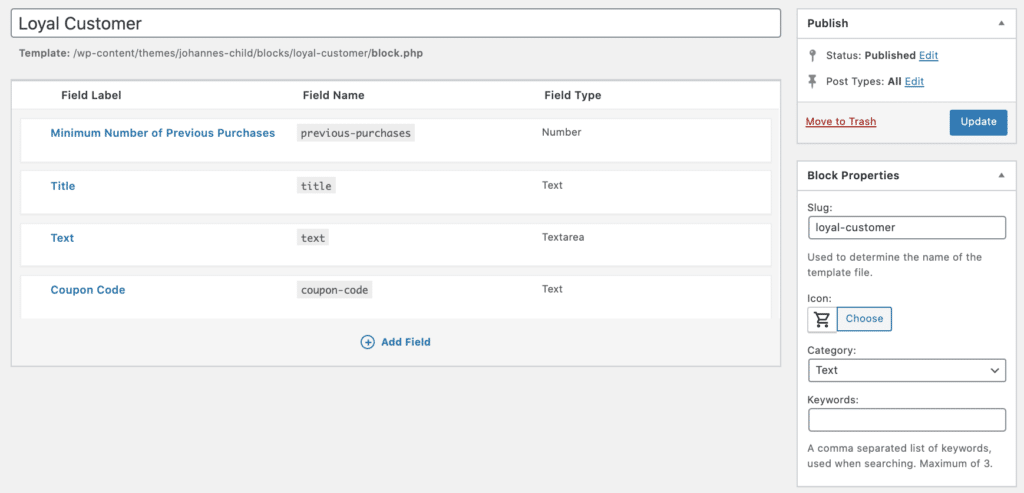
With WooCommerce and Genesis Custom Blocks installed, we have all we need to build this. In the WordPress admin, go to Custom Blocks > Add New. Here in the Block Builder we are going to register our block, configure a few things, and add a bunch of fields for content and settings:
- Title: Loyal Customer
- Slug:
loyal-customer - Icon: the shopping cart one
- Tags: customer, purchases, loyal, logged-in
We also add our block fields. These are:
Field Label / Name | Field Type | Details |
Minimum Number of Previous Purchases / previous-purchases | Number | Location: Inspector |
Title / title | Text | Location: Editor |
Text / text | Textarea | Location: Editor |
Coupon Code / coupon-code | Text | Location: Editor |
In the Block Builder, it looks like this:

Okay, quick stock-take. We’ve added the block and given it some fields. The three text fields are simply for the content we want to make editable for the block. The number field previous-purchases is where we want to define how many purchases a customer needs to have made previously to be able to see the block and, therefore, access the coupon code.
Step 3: The Block Templates
At this point, if we create a new page and add a block, we’ll actually see our Loyal Customer block. It just doesn’t do anything yet. It’s time to define our template.
First time templating? Check out the docs for a good 101. In our theme folder we add the following folders and files:
genesis-block-theme-child/
    blocks/
        notice-bar/
            block.php
            block.css
So we have:
- A
blocksfolder. This is where we will contain all our custom block templates, for this block and any others in the future. - A
loyal-customerfolder. This is where we add the template files for this specific block. - Both
block.phpandblock.css. These are the template files for this block.
Starting with the the PHP file, we code up:
<?php
// Minimum number of previous purchases to see the coupon
$min_previous_purchases = block_value('previous-purchases');

// Current Customer Previous Purchases
$customer_orders = get_posts([
    'numberposts' => 10, // one order is enough
    'meta_key' => '_customer_user',
    'meta_value' => get_current_user_id(),
    'post_type' => 'shop_order', // WC orders post type
    'post_status' => 'wc-completed', // Only orders with "completed" status
    'fields' => 'ids', // Return Ids "completed"
]);

// Number of Current Customer Purchases
$num_customer_orders = count($customer_orders);

if ($num_customer_orders >= $min_previous_purchases) { ?>
    <div class="gcb-loyal-customer" ?>');">
        <div>
            <h2><?php block_field('title'); ?></h2>
            <p><?php block_field('text'); ?></p>
            <div>
                <button>
                    <div>
                        <svg xmlns="http://www.w3.org/2000/svg" fill="none" viewBox="0 0 24 24" stroke="currentColor">
                            <path stroke-linecap="round" stroke-linejoin="round" stroke-width="2" d="M12 8v13m0-13V6a2 2 0 112 2h-2zm0 0V5.5A2.5 2.5 0 109.5 8H12zm-7 4h14M5 12a2 2 0 110-4h14a2 2 0 110 4M5 12v7a2 2 0 002 2h10a2 2 0 002-2v-7" />
                        </svg>
                    </div>
                    <?php block_field('coupon-code'); ?>
                </button id="coupon_button">
                <label for="coupon_button">Click the coupon to copy the code.</label>
            </div>
        </div>
    </div>
    <?php };
?>
Few things going on here, so let’s break it down:
- We create the variable $min_previous_purchases to hold the block’s previous-purchases setting. We use the block_value function from the Genesis Custom Blocks plugin to fetch this data.
- We see how many previous orders the currently logged in user has through the
get_postsfunction and the array of arguments. This returns an array. - We assign this array to the variable
customer_orders. - We
countthe number of items in the array. - If customer_orders are greater than or equal to min_previous_purchases, we output the content of the block, including our dynamic content using the block_field function.
In short, we check to see if the current user has greater than or equal to the number of minimum previous purchases and output the block if true.
We now need to style our block. Styling is very subjective to your site and dev set up, but here’s what I have in the block.css file.
.gcb-loyal-customer {
    position: relative;
    border-radius: 20px;
    text-align: center;
    overflow: hidden;
    background-position: center;
}

.gcb-loyal-customer h2 {
    font-size:  44px;
}

.gcb-loyal-customer>div {
    padding: 60px;
    background-color: #dae0df;
}

.gcb-loyal-customer button {
    position: relative;
    display: flex;
    align-items: center;
    height: 50px;
    border-radius: 3px;
    background-color: #ea533c;
    color:#ffffff;
    font-family: monospace;
    margin-top: 20px;
    padding: 0 2rem 0 0;
    margin: auto;
    padding-left: 2px;
}

.gcb-loyal-customer button:before {
    content: "";
    position: absolute;
    width: 12px;
    height: 12px;
    border-radius: 50%;
    left: -6px;
    top: 19px;
    background-color: #dae0df;
}

.gcb-loyal-customer button:after {
    content: "";
    position: absolute;
    width: 12px;
    height: 12px;
    border-radius: 50%;
    right: -6px;
    top: 19px;
    background-color: #dae0df;
}

.gcb-loyal-customer button div {
    display: flex;
    align-items: center;
    justify-content: center;
    width: 50px;
    border-right: 6px dotted #dae0df;
    margin-right: 2rem;
    height: 100%;
}

.gcb-loyal-customer button svg {
    width: 20px;
    height: 20px;
}

.gcb-loyal-customer label {
    font-size: 14px;
    font-family: monospace;
    display: block;
    opacity: 0.5;
    margin-top: 1rem;
}
With our CSS done, let’s swing back to the WP admin and add our block to a page.
Step 4: Using our Block

This is looking fantastic! Input values for the block fields are being output as expected. When we increase the minimum number of purchases we see that, because I only have a previous order history of 1, the block renders as empty.
Wrapping things up
This block is a great example of how easy it can be to get that unique functionality your store may need from its blocks.
A few other things that could be done to improve this block further are:
- Create a Preview block template that can render something different
ifthe conditions for displaying content are not met. For content editors, having something visual still in the editor would be useful. - Make the button actually copy to clipboard when clicked
- Add a taxonomy field that points to product categories and then add additional logic so that site visitors have to have an order including a product from a particular category to see the block/coupon
- As the user is seemingly logged in, use their name in the block. I.e. “Thanks Rob…” Personalisation FTW!
I hope you found this one helpful! It’s the first of a bunch of Woo blocks I and a few others are going to be playing around with in the coming months, so stay tuned!
Until next time, happy block building!
