One of the promises of the block editor was to bring the dynamic possibilities of widgets and shortcodes and make them first-class citizens in content creation. Many block libraries (like Genesis Blocks) give us dynamic features, but how can you do this in your own custom blocks? Well… it’s actually easier than you may think.
I’m going to show you how to build a super simple notice block that has a setting in the sidebar (sometimes called the Inspector) that lets you choose the notice type. The options will be “Info” or “Alert”. Based on the one that is selected the block will be styled differently and include different content (a unique icon).
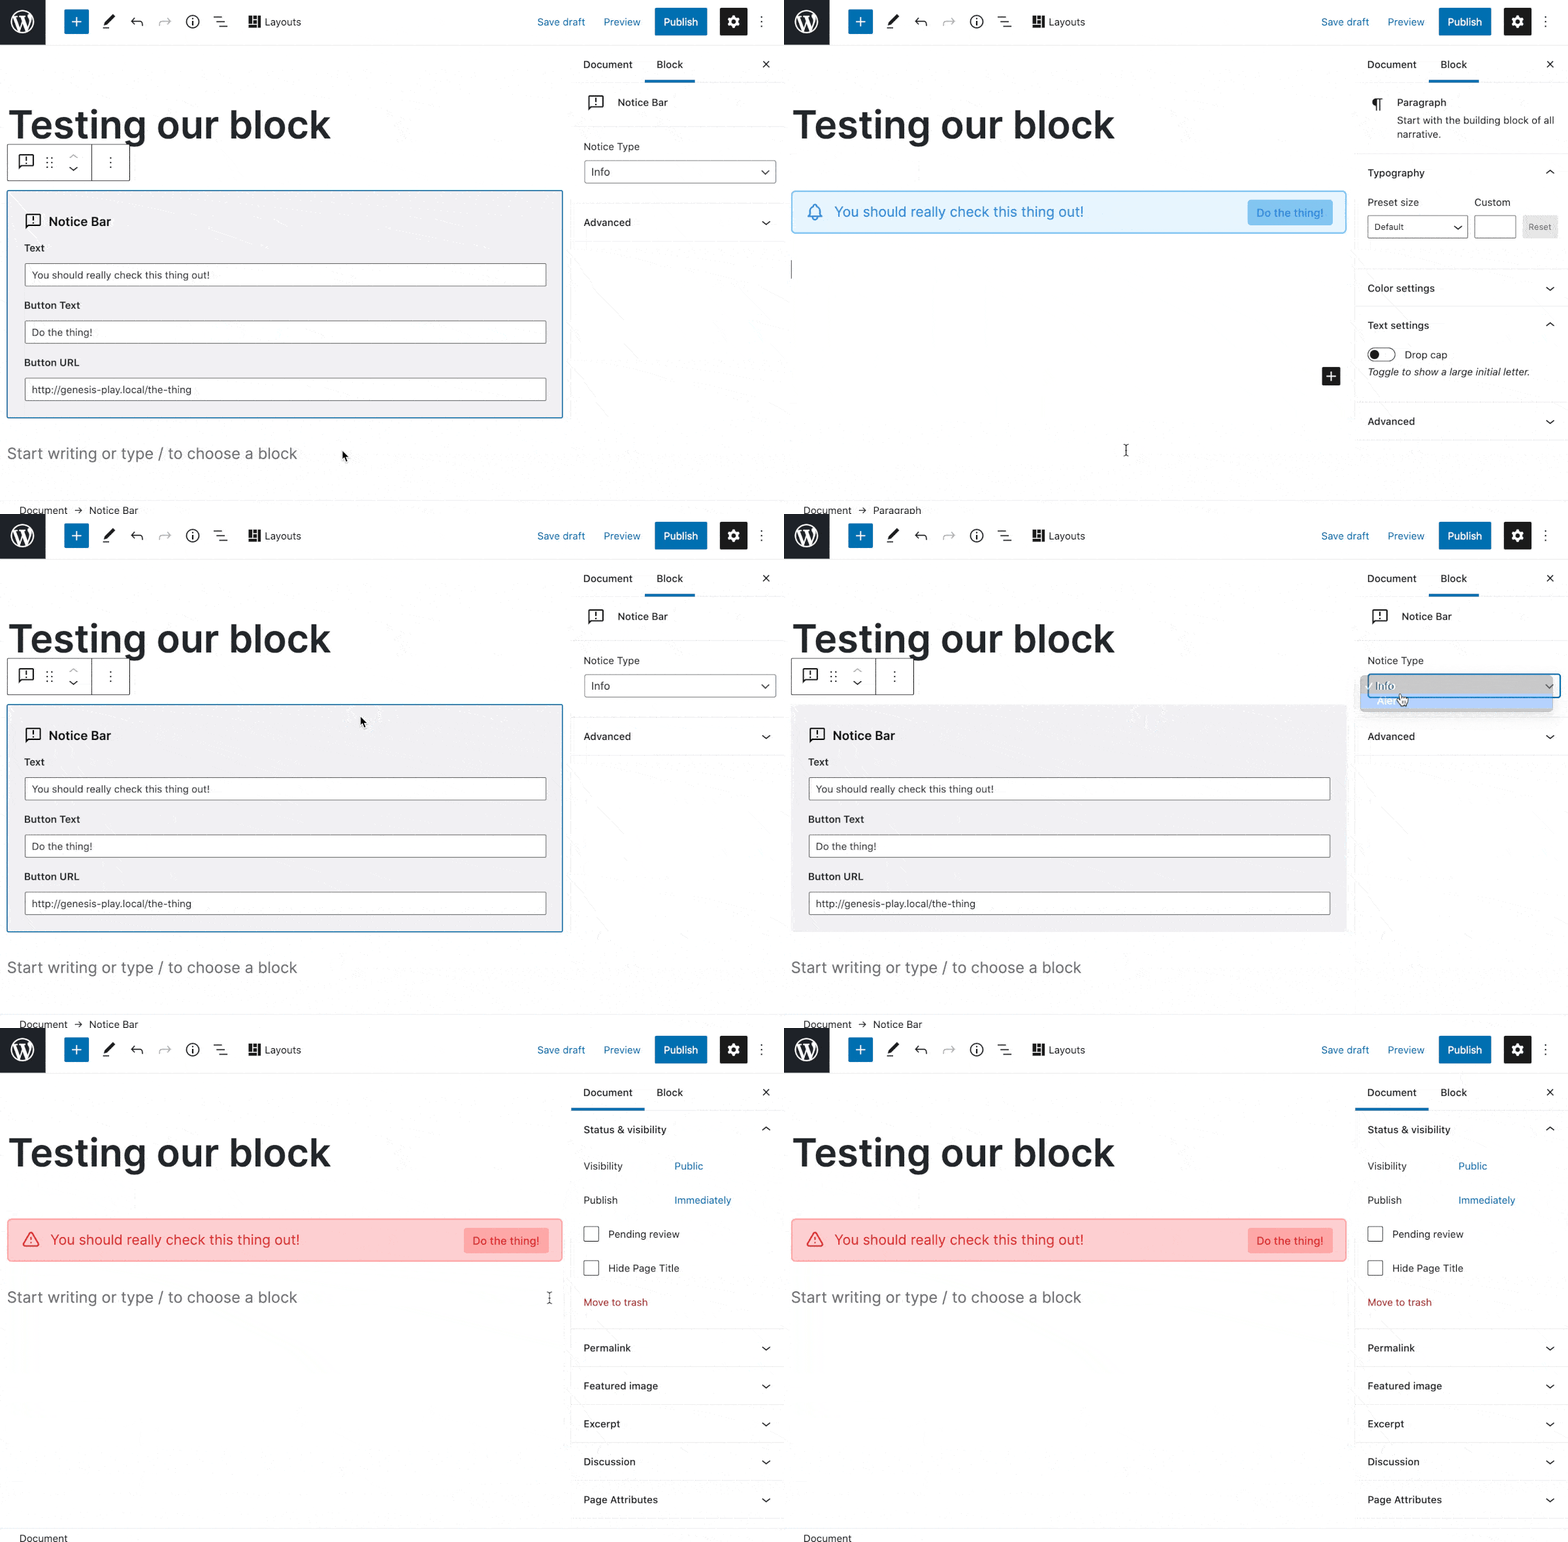
When the notice type is set to “Info” it will look like this:

And when it’s set to “Alert” it will look like this:

Pretty simple, but understanding how to work with conditional logic like this can unlock some seriously cool stuff for your custom blocks.
Let’s do this!
Step 1: Environment Setup
Every site is different, so I’m keeping this one super simple – hoping to make it as transferable as possible.
- The active theme is a child theme of the Genesis Block Theme Beta, but this tutorial will work with any theme
- Running on Local
- Genesis Custom Blocks installed and active
That’s it!
Step 2: The Block Builder
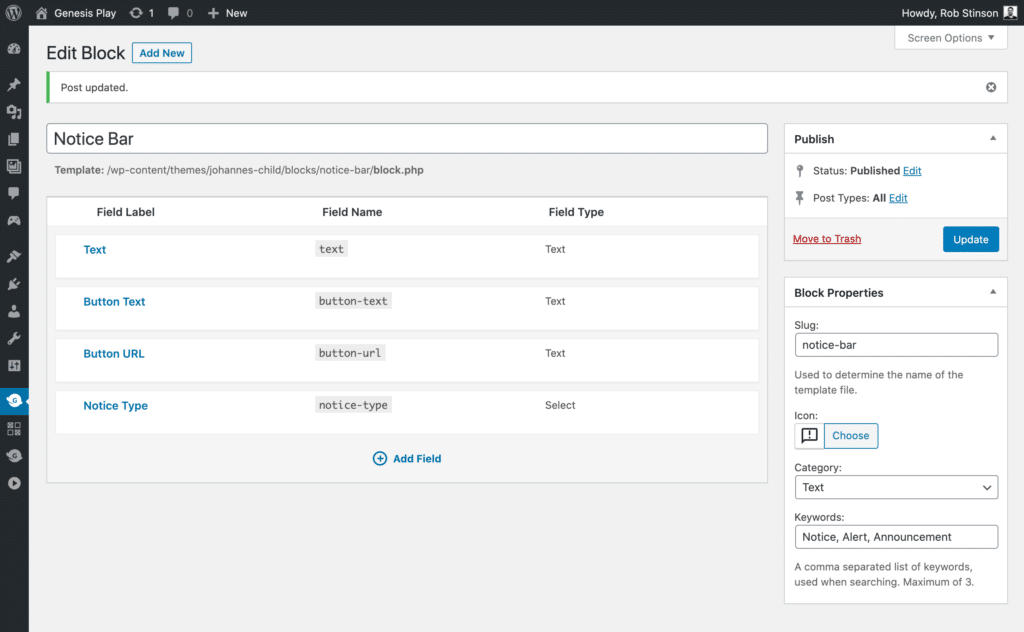
In the WordPress admin we go to Custom Blocks > Add New. On this screen, the block builder, we’re going to register and configure our block. We give it:
- Title: Notice Bar
- Slug:
notice-bar - Icon: the exclamation in a speech bubble one
- Tags: Notice, Alert, Announcement
We also add our block fields. These are:
| Field Label / Name | Field Type | Details |
Text / text | Text | Location: Editor |
Button Text / button-text | Text | Location: Editor |
Button URL / button-url | Text | Location: Editor |
Notice Type / notice-type | Select | Location: Inspector. Options: info, alert Default: info |
Your Block Builder screen should look like this:

Specifically, for the notice-type field, the options are:

notice-type field when the field options are expanded in the Block Editor.The block is now registered and configured. If you create a new post, the block is available to be added. It doesn’t “do” anything yet though. For that, we need to template!
Step 3: Block Templating
First time templating? Check out the docs for a good 101. Otherwise, in our theme folder we add the following folders and files:
genesis-block-theme-child/
    blocks/
        notice-bar/
            block.php
            block.css
So we have:
- A
blocksfolder. This is where we will contain all our custom block templates, for this block and any others in the future. - A
notice-barfolder. This is where we add the template files for this specific block. - Both
block.phpandblock.css. These are the template files for this block.
Starting with the the PHP file, we code up:
<?php
$notice_type = block_value( 'notice-type' );
$notice_type_class = ‘’;
if ( ‘info’ === $notice_type ) {
	$notice_type_class = 'gcb-notice-bar__info';
} elseif ( ‘alert’ === $notice_type ) {
	$notice_type_class = 'gcb-notice-bar__alert';
}

?>

<div class="gcb-notice-bar <?php echo esc_attr( $notice_type_class ); ?>">

    <?php if( $notice_type === 'info' ): ?>

        <svg xmlns="http://www.w3.org/2000/svg" fill="none" viewBox="0 0 24 24" stroke="currentColor">
            <path stroke-linecap="round" stroke-linejoin="round" stroke-width="2" d="M15 17h5l-1.405-1.405A2.032 2.032 0 0118 14.158V11a6.002 6.002 0 00-4-5.659V5a2 2 0 10-4 0v.341C7.67 6.165 6 8.388 6 11v3.159c0 .538-.214 1.055-.595 1.436L4 17h5m6 0v1a3 3 0 11-6 0v-1m6 0H9" />
        </svg>

    <?php elseif ( 'alert' === $noticetype ): ?>

        <svg xmlns="http://www.w3.org/2000/svg" fill="none" viewBox="0 0 24 24" stroke="currentColor">
            <path stroke-linecap="round" stroke-linejoin="round" stroke-width="2" d="M12 9v2m0 4h.01m-6.938 4h13.856c1.54 0 2.502-1.667 1.732-3L13.732 4c-.77-1.333-2.694-1.333-3.464 0L3.34 16c-.77 1.333.192 3 1.732 3z" />
        </svg>

    <?php endif; ?>

    <span><?php block_field( 'text' ); ?></span>
    <a href="<?php block_field( 'button-url' ); ?>"><?php block_field( 'button-text' ); ?></a>
</div>
So what’s going on here?
- We use
block_valueto fetch the value of ournotice-typefield and assign it to the variable$notice_type. - We use this variable to conditionally set the value of the variable
notice_type_class. - In the wrapping div for the block, we echo out
notice_type_classto be a CSS class for the block. - We have 2 inline
svgicons. Which one is rendered is determined by theifexpression that checks if the value of$notice_typeis equal to “info”. - Down at the bottom, we use
block_fieldto fetch and output our text content (text) and button content (button-urlandbutton-text).
That’s our PHP and HTML sorted. Now our CSS for styling. Big disclaimer, it’s totally subjective to the theme installed and your personal preferences. Anyway, this should give you a good idea:
.gcb-notice-bar {
    display: flex;
    align-items: center;
    height: 56px;
    border-width: 2px;
    border-style: solid;
    border-radius: 6px;
    padding: 0 16px;
}

.gcb-notice-bar__info {
    color: #4299E1;
    background-color: #EBF8FF;
    border-color: #90CDF4;
}

.gcb-notice-bar__alert {
    color: #E53E3E;
    background-color: #FED7D7;
    border-color: #FEB2B2;
}

.gcb-notice-bar svg {
    height: 26px;
    width: 26px;
    stroke: currentColor;
}

.gcb-notice-bar span {
    margin-left: 12px;
    font-size: 18px;
}

.gcb-notice-bar a {
    margin-left: auto;
    font-size: 14px;
    font-weight: 500;
    padding: 4px 12px;
    border-radius: 4px;
}

.gcb-notice-bar__info a {
    color: #4299E1;
    background-color: #90CDF4;
}

.gcb-notice-bar__alert a {
    color: #E53E3E;
    background-color: #FEB2B2;
}
Things to take note of:
- Using flexbox for our layout
- You can see how we’re using our notice type classes (
.gcb-notice-bar__infoand.gcb-notice-bar__alert) to style things differently.
With our CSS done, that’s our templating done! 🎉
Step 4: Use our Block!
Creating a new page (or post) we can add our block to the editor:

And when we add it, our form looks like this:


And with the field filled in, we get this:

You can see that with some simple templating, you can really unlock the dynamic potential of custom blocks. You can even reduce the number of custom blocks your site needs and create variations of a single block based on settings and configurations.
Hope you found this tutorial useful and interesting. Thoughts, comments, and questions? Just drop ’em in the comments.
Until next time, happy block building!
